Tuesday 31 May 2016

For the love of words


Ticking away at a typewriter and hearing the ding of the bell before hitting the return lever are some of my favourite sounds in the entire world. It's a type of satisfaction that you don't get while typing on a laptop or computer, and it reminds you of how good it feels to just sit and be removed from technology. I never thought I'd be this fond of typewriters, but the spare moments I've spent scrolling through Trademe and visiting local op-shops have proven that this fondness is growing on me a little bit too much. It is because of these spare moments and love for words that I've found myself with three of my own vintage pieces - a Smith Corona Corsair, Olympia Traveller de Luxe S, and most recently, an Olivetti Lettera 32.

I used to keep these babies proudly displayed in my room - on my desk and cabinet - before deciding to keep them in their cases to keep them beautifully pristine.  Now, only my most recent typewriter is displayed on my desk, with the others kept in their cases and brought out for maintenance and story-writing.


My most recent (and current favourite) purchase is my Olivetti Lettera 32, which I bought from Trademe and picked up in Auckland. The seller told me that it belonged to her grandfather and was so relieved when I told her I'd be using it for writing instead of keeping it as a prop. A popular typewriter amongst enthusiasts and successful writers, the Olivetti Lettera is a beautiful machine. This is particularly evident in the Olivetti that I bought since it was so nicely taken care of. I love the muted teal colour and how it looks so robust, as if it's just waiting for a manuscript to be written on it. A downside that I've noticed so far? There have been times where I'm on a typing roll and have missed the ding of the bell! I love the sharp reminder of the bell and constantly wish it was much louder!

This was my post-exam gift to myself and it felt incredible to win the auction for this particular typewriter. I had been looking for a great quality Olivetti Lettera 32 for more than a semester after losing out on multiple auctions so I'm so happy to call this baby my own.

I've created quite a ritual for myself when it comes to typing: put away my electronics, brew a cup of tea (but apparently in these photos a cup of water), take my watch off, put on some hand cream, pile a stack of clean papers next to me, open up my bullet journal, and... well.... type. Doing this has become a hobby and a replacement for writing in my diary!

I love having my bullet journal next to me since I can review my to-do lists and priorities for the day. My next writing goal is to create a letter to myself and open it up in five years' time, and I have a whole bunch of other crazy ideas on my list.

Fun fact: "typewriter" is the longest word you can type using only the top row on a qwerty keyboard!

My Moleskine journal, two of my Frank Stationery notebooks and my yellow Lamy Safari that's currently inked up with J Herbin Rouille d'ancre. 

A sample of the typebar output from my Olivetti - with a fresh ribbon!

Olivetti without its top cover - from here you can see the ribbon and typebars (which admittedly needs a bit of a clean). 

Thursday 19 November 2015

The Cat Lounge


I love cats. Love them. All my Snapchat friends would know this since my fur baby Misty features in my story 89% of the time. So you could just imagine my excitement when an Auckland pair decided to open up New Zealand’s first cat cafe! I thought it would make the perfect date day.

The Cat Lounge is perfectly situated on the North Shore and serves delicious Chai Lattes (and other drinks of course). The cafe itself is separated from the cat lounge but they do serve your drinks in takeaway containers to take in with you.


There were lots of cats. Lots of cats and kittens. They were all so friendly and ready to be cuddled, patted and played with but they would also be content with sitting on your lap and having a nap. The best thing about the one-hour sessions is that they make sure only a certain number of people are inside the lounge so everyone gets to cuddle a cat. There's lots of space for the cats to walk and run around, including small bridges and shelves for them to sit. I loved the faux TV fireplace near the couches, surrounded by pictures of other cats ready to be adopted from the local shelter. 

After a good round of chasing tiny toy mice, these two beautiful kittens were keen to cuddle and nap on us the rest of the session. Shortly after residing on the couch, their friend Charlie strutted over and became adamant on giving them a thorough cleaning. Throughout being licked and prodded by Charlie, the kittens happily stayed asleep.

The white kitten slept on Yuri for around 40 minutes and within that time it received a bath from Charlie, rolled away from Yuri's lap and got picked up and moved into what seemed to be a more comfortable position without any complaints. The kitten on my lap didn't miss out on a bath either and looked drenched by the end of it!

During the session I sent pictures to my mum who got a little bit too excited and announced she'd join us. She fell in love with Ed who enjoyed getting picked up even though he was in the middle of a nap. All in all, we loved spending a portion of our afternoon here, it was so relaxing and a nice way to spend the day since the weather was gloomy. I'm already planning when I can visit next and who I'll bring with me!


Spending the day with these kitties only made me love my Misty even more - Yuri and I made her a DIY scratching pole/bed combo that I'll post soon! She's been especially cuddly lately which makes me so happy :)

The Cat Lounge's sessions for up to an hour are $10 and they highly recommend calling in to book (we did since we came in around lunchtime). Even if you're not a cat lover you will SO fall in love with this place, there's nothing cuter than having a kitten nap on your lap.


Check them out on their website and on Facebook. People have also uploaded some wonderful pictures on Instagram with the hashtags #TheCatLounge and #TheCatLoungeNZ!

Thursday 19 February 2015

Matcha (Green Tea) Macarons

Macarons are an incredible thing. They make you fall in love with them the moment you take a bite of the crunchy outer shell, instigating a beautiful crack that leads to a gooey shell body. And the filling? Oh don't get me started on the filling - buttery and packed full of flavour. If you were salivating reading that description, try and make some of your own: 

Matcha (Green Tea) Macarons
Yield: 15+ depending on the size you pipe

Ingredients:
  • 115g almond powder
  • 230g icing sugar
  • 1 tbsp matcha powder
  • 140g egg whites (at room temperature)
  • Small pinch of fine salt
  • 70g caster sugar 
  • Small squeeze of lemon juice
  • Green food colouring

For the buttercream:
  • 150g butter, softened
  • 1/2 cup icing sugar, sifted
  • 2tbsp matcha powder
  • 1 vanilla pod, seeds scraped off


Method for shells:
  1. Preheat oven to 120 degrees C.
  2. Prepare cookie sheets line with baking paper
  3. Prepare meringue shells: In a food processor, blitz almond powder, icing sugar and matcha powder until fine.
  4. In a mixer bowl beat eggwhites to soft peaks then add salt. Slowly add in sugar and beat to whisk until stiff but not dry (meringue should be glossy). Gently fold in almond mixture, add in food colour to enhance the green colour of the meringue. 
  5. Pipe into small rounds and leave to dry for 30 minutes.
  6. Bake for about 30 minutes or until crisp on the outside. Cool meringue shells before filling with buttercream.


Prepare buttercream:
  1. Place all ingredients in a mixer bowl (soft butter, icing sugar, matcha powder, vanilla seeds) and beat at medium speed until light and fluffy. Transfer to a piping bag.
  2. Assemble macarons by filling one meringue shell and piping buttercream in the centre and top with another shell to create a sandwich. 
Make sure you comment down below if you try this recipe out! My aunt Jane from JaneskitchenNZ says that Matcha is the new salted caramel, let us know what you think!

Thursday 8 January 2015

Bali, Gili Trawangan and Lombok Adventures!

"The world is a book and those who do not travel read only one page."
- St. Augustine

I've been having a pretty good break from a lot of my social media platforms lately. Recently, I've been excited to share my life again as I've returned from Bali, Gili Trawangan and Lombok. This vacation has proved to be some of the most incredible and adventurous days of my life. So before sharing a long blog post about which places we visited and what we did, here's a short video of our adventures: 

Tuesday 25 November 2014

Learning Modern Calligraphy!


For months I would look at Pinterest to find beautifully addressed envelopes and elegantly written bible verses and yearn to possess the skills these artists had with pointed-pen. For weeks I would tell my mum that I'd start learning once my exams would finally be over and finally the day came where I visited my local art store to buy some supplies.

After searching through various blogs, video tutorials, and Skillshare classes, I started creating mental notes of calligraphy techniques I would need to employ and physical notes of the supplies I would need to find. Needless to say, I became pretty anxious with wanting to begin. After approximately two weeks of practicing, I want to share what tools and resources I've used that have helped me develop my skill. Hopefully some of you will find this blog post helpful!

Pictured from left to right:

  • Rubbing alcohol - used to clean nibs when I'm ready to pack up. I've been quite diligent with cleaning my nibs after practicing and this rubbing alcohol ensures that the nib dries completely to prevent rusting.
  • Higgins Eternal Black Ink - a staple of many calligraphers, this works well on different types of papers.
  • Sumi Black Ink - the first ink I used when I first started calligraphy, I prefer it a little bit more than the Higgins because it's thicker and more opaque.

There was one time where I was writing and a substantial amount of ink decided to splatter all over my white acrylic table. I panicked and started wiping it with a kitchen towel (worst idea ever) which spread it around before quickly starting to dry. It only decided to give after I used two Dettol disinfectant surface wipes and a paper towel drenched in rubbing alcohol. Needless to say I don't want to ever re-live that. So I stole my dad's drawing board


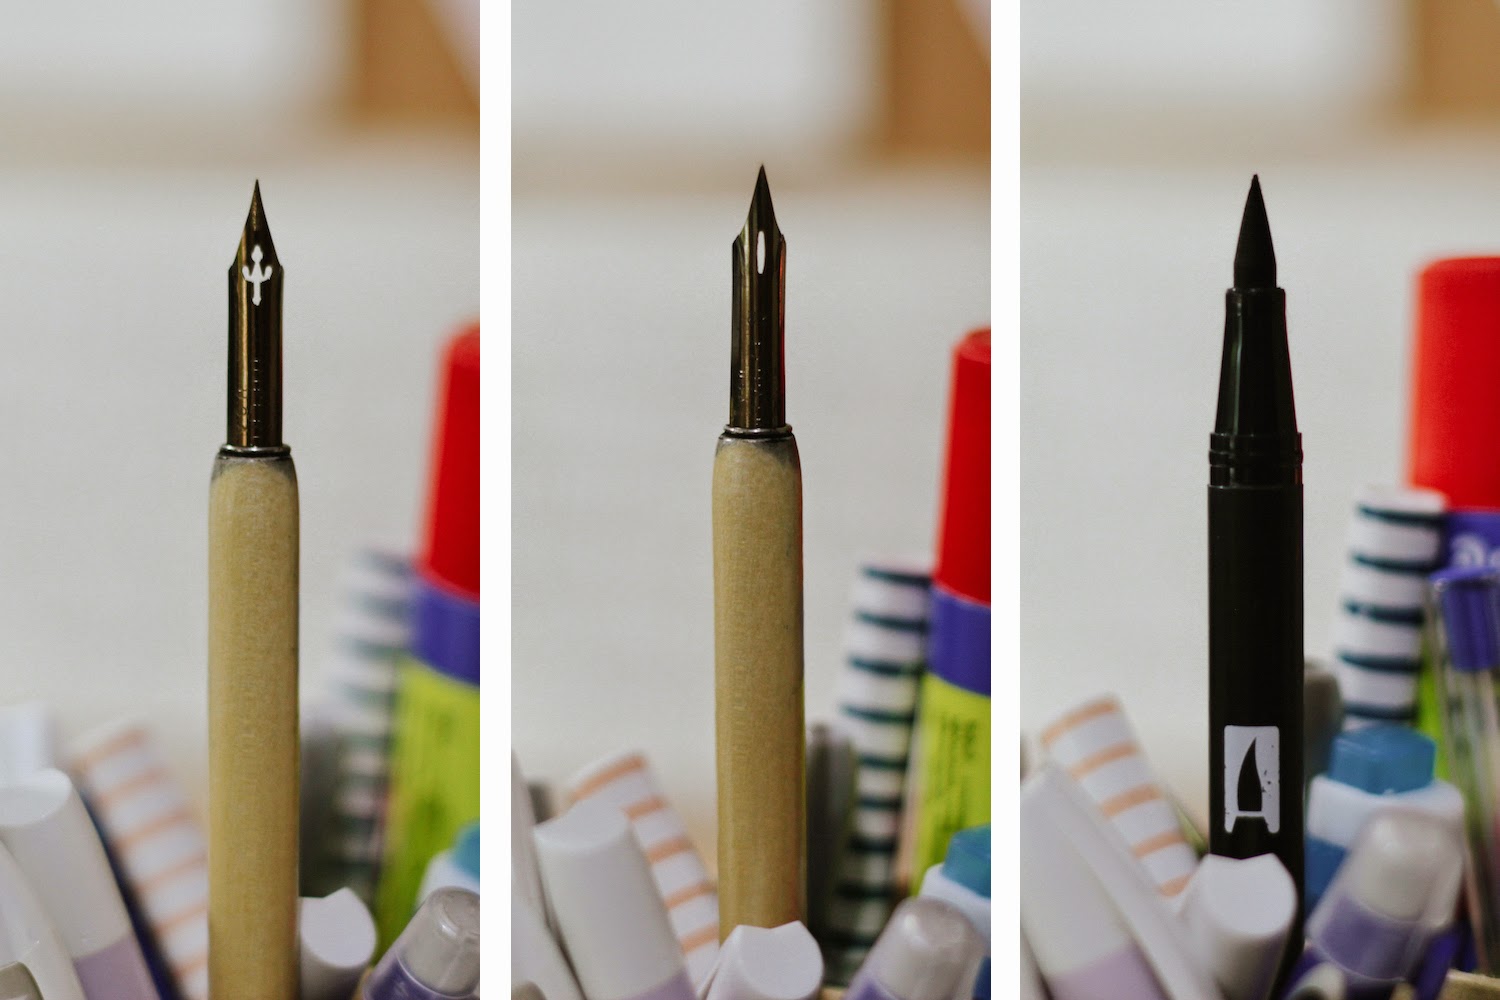
I found it especially hard trying to find the nibs most calligraphers recommend (Brause Blue Pumpkin, Nikko G, Zebra G), but after looking through some Pinterest posts, I saw that a calligrapher recommended the Hunt Imperial 101 (nib on the left) and the Hunt 22B Extra Fine (nib in the middle). These are also the nibs that Melissa Esplin recommends for her istilllovecalligraphy class

The Hunt Imperial is great for making thick downstrokes, something I find useful for larger works, while the Hunt 22B creates thinner downstrokes, which I use for smaller written quotes. I bought these two nibs at the Takapuna Art Supply Store, along with the two inks, nib holder, and Canson pro layout marker paper (not pictured).

The marker on the right is the Tombow dual-ended brush pen, which I bought before my nibs and have used sparingly since then. I haven't touched my Tombow in a while since I'm not actually good at brush calligraphy (sigh, one day) but I have used it for bolder-looking works a handful of occasions. I bought my Tombow at Gordon Harris


Resources I find helpful:
  • Pinterest: There are so many great calligraphy examples on this website, I can pin for hours on end! I've found it especially useful to look at how other calligraphers construct their letters (I've found that the letters p, q, z, f and b frustrate me!). As I've gotten more confident with my own calligraphy style, I've started to look at practicing other 'fonts', and Pinterest provides great examples of these too. Searching the "quotes" tag lets me practice different letter combinations and helps me add to my favourite quotes collection!
  • 'Calligraphy I: Writing in Modern Script' Skillshare class by Bryn Chernoff: This class is fantastic and was what I watched before picking up my nibs. Bryn's Skillshare classes are conveniently split up into different learning blocks which makes it easy to re-watch. I do have to admit, I haven't watched all videos that Bryn provides (Skillshare has a limited freemium streaming time), only until 'constructing letterforms' but I do plan to watch them all in the future, and maybe even contribute to the Project Gallery. 
  • Instagram: There are so many calligraphy pros out there in the Instagram world and I love it when I see a post from any of them on my feed. Scrolling through their profile gives me a little bit of hope that one day I'll be as skilled and creative as them. 

After this equipment talk I really want to start talking about how I've found learning calligraphy. In short, I'm loving it and it has been so much fun! Growing up (and even now) I've had an interest for writing - in notebooks and spare pieces of paper, so much so that I have a ridiculous collection of notebooks that I have but don't necessarily use. It's a bit of a problem, and my mum hates it when I step into a Kikki K but I would buy stationery over clothes any day.

Friday 21 November 2014

Black Velvet Cupcakes


You've all heard of red velvet cupcakes, but have you ever heard of black velvet? If Darth Vader were trying to convince you to come to the dark side, he'd be holding a tray of these. Made from a mixture of Equagold Black and Dutch Processed Cocoa, the darkness of these cupcakes is achieved without any food colouring! This recipe is taken from my aunt Jane's blog (Jane's Kitchen) with permission.

Black Velvet Cupcakes
Yield: 36 regular sized cupcakes

Ingredients:


Method:
  1. Preheat oven to 160°C.
  2. In a bowl, combine all dry ingredients and sift.
  3. In a mixer bowl, combine all wet ingredients (eggs, buttermilk, oil, coffee, vanilla paste). Using the paddle attachment, beat ingredients until well combined at slow speed for about a minute.
  4. Add in all of the sifted dry ingredients and beat at medium speed until well combined and no traces of dry ingredients for about 3 minutes.
  5. Transfer and divide mixture into cupcake liners set on muffin tin pans.
  6. Bake for 18 minutes or until cake springs back when touched. It's a moist cake and inserting a toothpick or cake tester is not advised.
  7. Cool on a cake wire rack until ready for icing. When the cupcakes are completely cool, ice as desired. 
Vanilla Cream Cheese Icing

Ingredients:
  • 100 grams butter, softened (we used Whitestone unsalted butter)
  • 250 grams cream cheese, softened
  • 4 cups icing sugar, sifted
  • 1 vanilla bean, seeds scraped off
  • Zest of 1 mandarin

Method:
  1. In a mixer using the paddle attachment, cream the butter, cream cheese, mandarin zest and vanilla seeds until smooth.
  2. Add in icing sugar and continue mixing until fluffy and light for about 5 minutes on medium speed
For toppings:
  • For this cupcake, we garnished the top with mini chocolate chips and freeze dried raspberry powder.


My aunt Jane has a blog of her own where she posts food-finds, recipes and articles! You can find her recipe index here, of which my favourites are the Red Velvet Crinkles, Momofuku-inspired Corn Cookies, and the Savoury Cheese Cookies.

Make sure you comment down below if you give these cupcakes a go, they are mighty delicious!

Sunday 16 November 2014

Wonderful Internet Finds: TED Videos

I have a plethora of links that I've bookmarked in my browsers from wonderful things I find on the internet. They vary from lifestyle blogs to Buzzfeed links to makeup tutorials to how an amateur can improve their photography game - the list is endless. What I've noticed recently is that I have a bunch of wonderful internet finds that I forgot even existed and I refuse for them to get lost in the depths of the internet so I'm going to start a new blog category where I share a few of these things.

I'll start with my favourite TED: Ideas Worth Spreading videos. I'm yet to find a TED video that is less than intriguing and doesn't provoke deeper thinking so my first recommendation would be to go to the TED website and watch whatever your cursor lands on first. However, if you need a kick start, here are four videos that I love:


This is the number one TED talk to currently exist, and greatly altered the way I communicate when I speak and share stories. "People don't buy what you do; they buy why you do it, and what you do simply serves as the proof of what you believe."


2. Ziauddin Yousafzai: My daughter, Malala
The father of an iconic figure, Malala Yousafzai who fights for the rights of children and women, talks of patriarchal society in developing countries, the effects of 'Talibanisation' and the power of education.


3. Kakenya Ntaiya: A girl who demanded school
An incredibly brave woman who agreed to undergo a traditional Maasai rite of  passage of female circumcision as a condition to allow her to attend high school. She talks of her journey for higher education and how her story has influenced and changed the lives of many from creating a school in her community.


4. Monique Coleman: The Path to Purpose
Feel free to skip the first six minutes of this talk, as she gets to the meaningful conversation after this. Monique discusses service as a path to purpose and how young people can truly make a difference. "The first act of service is recognising the intention to serve, acknowledging the burning desire to do something bigger than yourself and to make a difference in the world"


I hope you find great sources of inspiration within TED talks, the four that I've linked are only to get you started. From these, my eyes have been opened to truly incredible people who have lifetimes worth of stories and knowledge to share!